End of egg
-1 IntroductionThe second article in the previous section talked about the collocation of hardware. For non-needs, the idea of ​​hardware collocation starts with the budget and the existing accessories . For example, if I don't have a G840 CPU, I might choose an N3 based itx board (N3150/N3160/N3700, etc. now). This results in lower power consumption and a shorter CPU cooler. I can choose a smaller chassis. ,and many more……
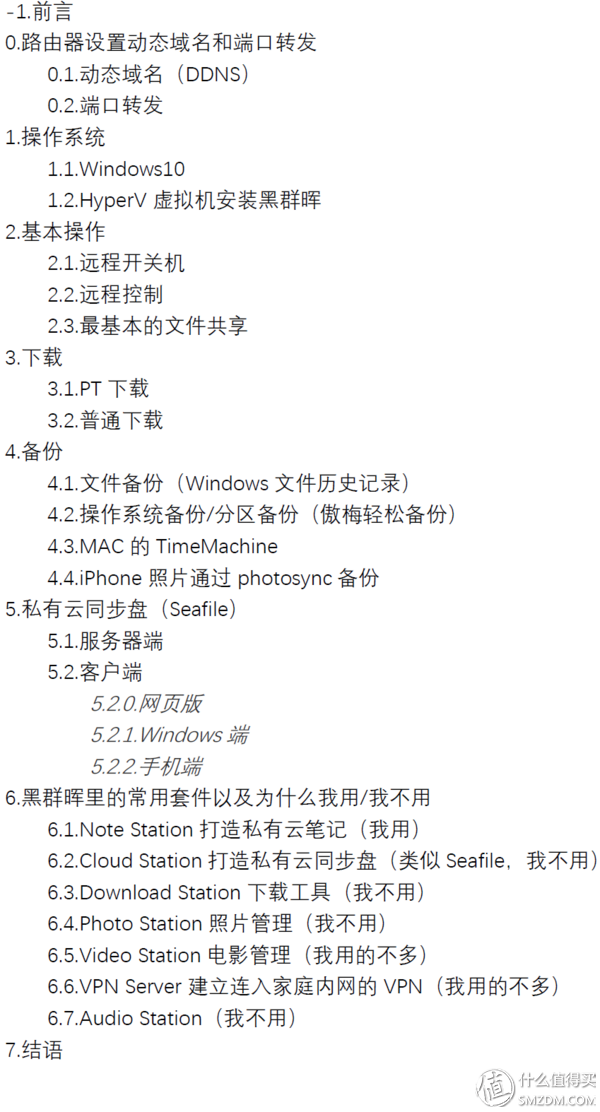
This article focuses on the setup of my NAS/HTPC computer in NAS. The idea of ​​software setup is based on the needs . The full text is full of personal colors, not necessarily for each reader's needs, but just as I learned a lot of knowledge from everyone's articles, I hope my lessons can bring us inspiration and inspiration.
The main operating system is Windows 10, and Blackgroup installed through the virtual machine provides only a few functions (private cloud notes, Time Machine backup of the MAC system, etc.). If you feel that using virtual machines exceeds your capabilities, or there is no similar Requirements, the relevant part can be skipped. If you think that the setting of windows is too complicated, then you can understand why Bai Qunhui's software and services can sell so much money, because it is really worry!
0. Router Setting Dynamic Domain Name and Port ForwardingSince the number and the directory were listed first, and it was found that there was one step ahead, we had to change the preface to -1 and the router became 0.
Do you have needs? - If the requirement for NAS service is limited to the internal area of ​​the home network (wired, wireless) and does not need to be used in units, outdoors, etc., the setting of this step is not required. Jump to 1 directly.
0.1. Dynamic Domain Names (DDNS)
The function of the dynamic domain name is to locate the network gate (router) of your home through an address like “.f3322.net†at home and abroad every time (scientific name is a domain name) without using a router dial-up connection every time. Check what IP address was allocated this time.
The above example .f3322.net is my own free dynamic domain name service provider, f3322.net registered website is http://, can try the desired prefix in http://, if no one has registered, himself You can register. Remember your username and password when registering. Everyone can try to register the following domain name:
OK, then go back to your router settings screen and find "DDNS" or "dynamic domain name" to see if f3322 is supported here. I use the r6300v2 brush merlin firmware is supported.
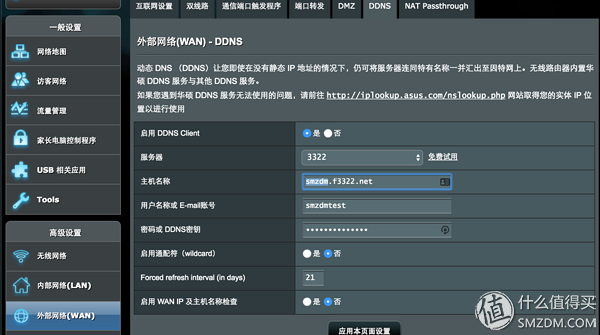
Select 3322 service in WAN-DDNS, input your own selected address, user name and password, and save it.
Addition 1: If you were originally an Asus router, you can directly select the asus service here and enter a name you want! Do not register! Enjoy ASUS's services for you directly.
Supplement 2: Bai Qunhui also comes with this feature (called QuickConnect). The reason why so many people want to blackwash whitewash is also for this DDNS function. When you set up a free DDNS on your own, you don't need whitewash, and the whitewash is actually a DDNS server at Synology Group. (However, the service providers that can be selected in the group's page do not include 3322, you can try peanut shells, no-ip, etc. The disadvantage of no-ip is that you need to click the link in the email to reactivate every month.)
0.2. Port forwarding
Please first learn how to set up your NAS as a static IP (fixed IP) in the LAN. In the following example, I set it to 192.168.1.198.
Well, with smzdm.f3322.net, your house number will be there. When we use different services each time, we need to access different “ports†under this house number. We need to map a certain external port of the router to a port on the home NAS. This process is called “port forwardingâ€.
Similarly, find the port forwarding setting interface in the router, as shown in the figure:
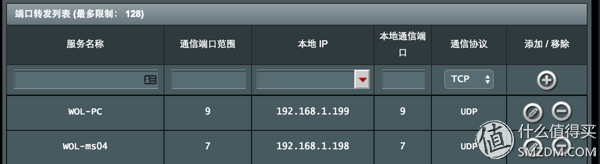
The "service name" is a note, you can read it on your own.
Later, in order, 9---192.168.1.199-----9----UDP indicates that when the router accesses the “9 (first number)†port from the external network, the router will make this connection. Transfer to the "9 (second number)" port of the internal "192.168.1.199" machine (my desktop). UDP indicates that only UDP protocol is forwarded, and the other is TCP. If you do not know whether a service requires UDP or TCP, BOTH can be selected.
7---192.168.1.198----7---UDP means that when accessing 7, it is forwarded to port 7 of the machine 192.168.1.198 (my NAS).
These two port numbers are used by me to remotely wake up my home computer from outside the home. If I don't understand it, I can imitate it.
(In each entry, the outer and inner two port numbers can be different. The reason why I make them the same is for simplicity)
Now, when I visit smzdm.f3322.net:7, it is equivalent to accessing 192.168.1.198:7 in my home network.
Operating systemI chose to install win10 on an SSD, hypervir hypervisor installed on Synology, and Synology using a virtual disk (.VHDX, which uses a file to simulate a disk).
1.1.Windows10
Win10 installation will not say. For reference, I set a password for my win10 account. Since the win10 system is also installed on the desktop, the following distinction is made between NAS-win10 and PC-win10.
Advantages of setting up a password: It seems to feel safer. If someone breaks into your wifi, at least it will not be able to access the NAS smoothly.
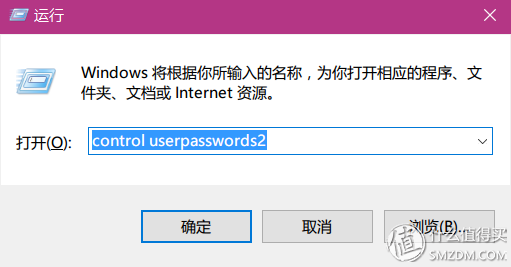
Disadvantage 1: Every time the boot needs to enter the password to log in.
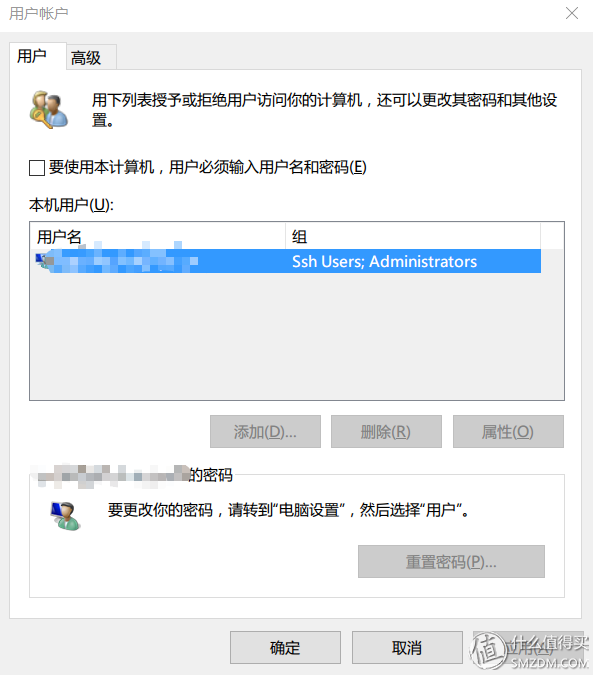
How to solve the disadvantage 1: NAS-win10 → Start → Run → enter "control userpasswords2" → Enter → In the newly opened dialog box, uncheck "To use the computer, the user must enter a user name and password" → Continue in the new dialog In the box, enter the username and password you want to automatically log in and save it.
Disadvantage 2: When using Windows' own "remote desktop connection" function to control NAS-win10, because win10 is not a server system, it does not support the simultaneous use of multiple users at the same time, so the remote NAS-win10 will be automatically locked. That is, it becomes a lock screen interface. NAS-win10 does not log in automatically even if you quit the remote desktop function on the client. If this computer is also used as an HTPC, you need to re-enter the password to log in when using it on your TV.
How to solve the disadvantage 2: Do not use the "Remote Desktop Connection" function to control NAS-win10, use other methods: VNC, TeamViewer and so on.
1.2.HyperV Virtual Machine Installation Black Group
In the same way, there are already many articles on and off the station explaining how to use Win10's own HyperV virtual machine to install Blackgroup. A recent high-quality article such as: (thanks to @Anonymity, everyone can collect praise and reward.)
The process of installing the virtual machine BlackSmith is the same as the first step of DSM and the second step of NFS.
Black group Hui is not necessarily installed? To repeat what the preface says, in the application I built, only the private cloud notes and MAC system's TimeMachine backup function will definitely require Blackgroup. So look at personal needs.
2. Basic operation 2.1. Remote Switching Machine
Black group Hui, each time with NAS-win10 start and start, it will not set up a remote boot.
Black Group Hui, as long as the login through the web page, you can click the mouse to shut down, the operation and Bai Qunhui is the same, but here is just turned off the virtual machine, and will not shut down the host windows system.
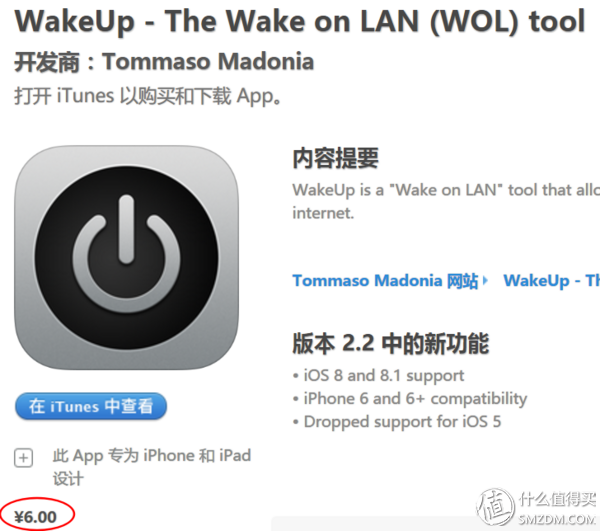
Windows how to turn off and on? Through online search and organization, the best way to use the current experience is - and this is the first "What's Worth to Buy" - an APP, wakeup.
Https://itunes.apple.com/us/app/wakeup-the-wake-on-lan-wol-tool/id484226812?mt=8
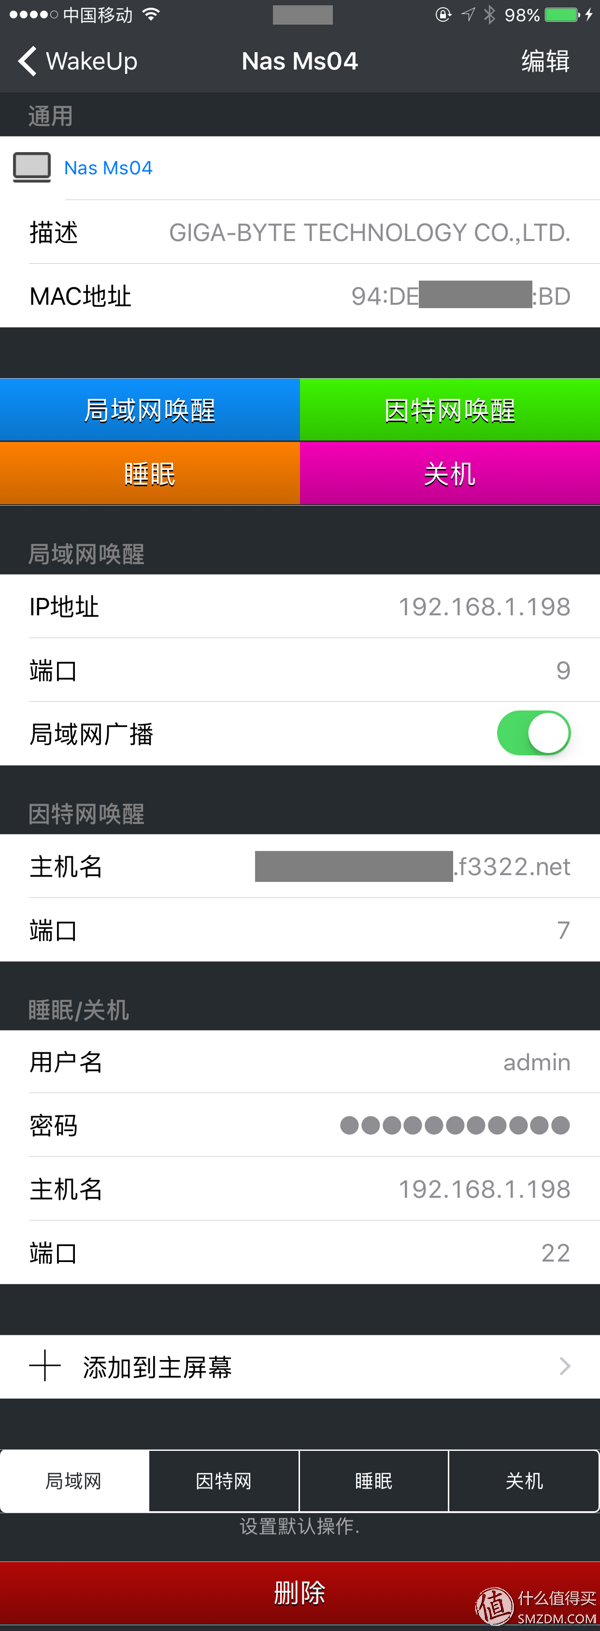
The use of this software is very simple, as shown above, after opening the software first find the machine you want to set in the LAN through the search add function, the software will automatically display the MAC address, then:
Enter the IP address and port of the NAS in the LAN and you can use Wake on LAN.
Enter the hostname "smzdm.f3322.net and the port number" (see Dynamic Domain Names and Port Forwarding above for this step) and you can use the Internet to wake up outdoors.
Install a small wakeup official software (http://) in NAS-win10, open your own user name, password, port (default 22, can be modified), and still input in the app, you can in the LAN Use "sleep" and "shutdown" again (please allow this software to boot).
Simple, convenient, fast, full-featured, bunker! As long as ¥6.00 yuan! Has it already been downloaded?
Slow!
The above functions are just for your convenience. In fact, in order to realize the remote boot, you have to do some preparatory work:
1 Make sure the motherboard supports WOL (wake on lan), either look at the purchase page instructions, or look at the instructions, or ask the store or customer service. The good news is that newer motherboards now basically support this feature.
2 Enable WOL in the motherboard BIOS settings (good news is that most motherboards are enabled by default).
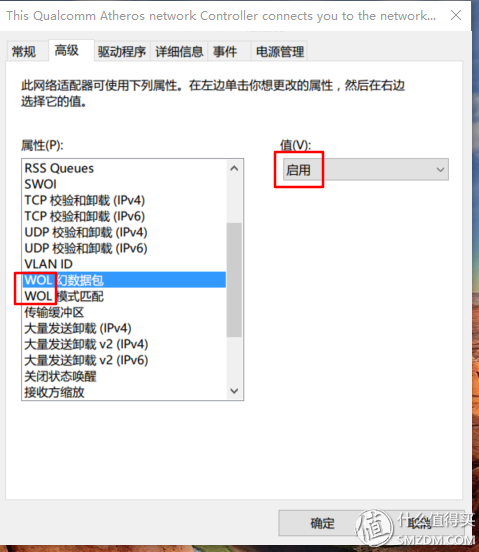
3 In the NAS-win10, open the "Device Manager", find your wired network card, double-click, in the "Advanced" to find WOL or wake-related functions, are "enabled." In "Power Management"... strangely, why is my setup like this? However, it can be used normally. (So ​​the good news is that many network card's default settings don't need to be changed. Use it directly.)

So in the above three steps, it seems to me that, in most cases, you can keep the default, and you can't read it.
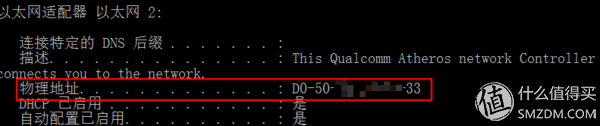
4 Find the MAC address of your NAS card: NAS-win10 → Start → Run → Enter “cmd†Enter → Enter “ipconfig /all†in the black window Enter → Find the data corresponding to your wired network card in the returned result. The "physical address" inside is the MAC address, but it is separated by "-". When used in all the following scenarios, please change it to ":". This is D0-50----33 in the figure below.
5 to the router to test whether it can start from the router:
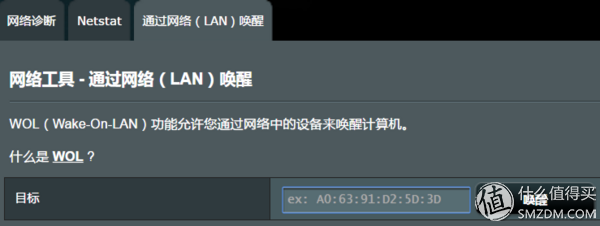
If the router is a merlin system, please click "Network Tools" on the left and "Wake on LAN" on the right. Enter the destination MAC address, such as D0:50::::33. Click to wake up to see if it can be started. (If you do not bother you, you can use it every time.)
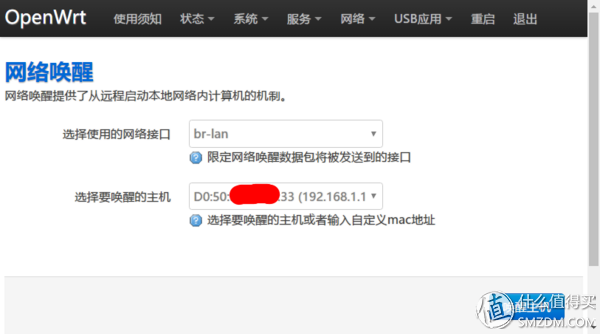
If the router is openwrt system, please "Network" → "Wake on LAN" above, select the network interface is the interface that binds lan, the host below enters the destination MAC address, click to wake the host to see if it can start.
Other system routers please play it yourself.
6 Bind the IP address and MAC address of your NAS in the router, which is the arp binding. If you do not do this, you cannot use App-wakeup to complete the external network wake-up, you can only think of ways to manually log in to the router interface, use the fifth step to wake up.
How to bind? Refer to the preparation of the router script, merlin system reference http://koolshare.cn/thread-7497-1-1.html, cited as follows:
Openwrt please refer to this article http://
After these commands complete the binding operation, you can remotely wake up the NAS in your home network. (set to automatically start these commands for the router to boot)
2.2. Remote Control
External network control : You can use TeamViewer, which is the best way to remotely control the windows system from home (this software can penetrate the intranet, that is, you can use it without setting dynamic domain name and port forwarding). This is a The free software for individual users supports Chinese, and the software needs to be installed on both the server and the client. The client supports PC, MAC and various mobile phones. There are many online tutorials, and we will not go into details. The official website https://

Intranet control : For NAS-win10, intranet control can use “remote desktop connectionâ€. The disadvantages of this method have been mentioned above, which is to cause NAS-win10 to automatically lock at the remote end, affecting the function of HTPC.
However, this method also has the advantage that when it is operated on a mobile device such as an iPad, click on the location where the target = finger is directly clicked. Therefore, after the "Plate Mode" of the Windows 10 is opened, the click is as convenient as using the Surface. This is better than the VNC introduced below. On the mobile device, it is still dragging the screen with your finger to move the mouse pointer, and clicking the target = the position to which the mouse pointer points, so even if you change to "flat mode", there is no advantage.
I used the intranet control: VNC . VNC is a widely used remote control protocol on linux and mac platforms. The use of windows requires the installation of a server and a client. Usually, the server and the client can use one company, common ones include TightVNC and RealVNC.
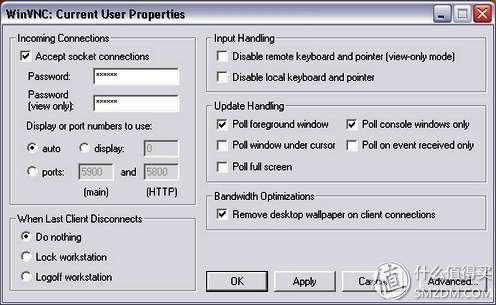
Personal recommendation server uses TightVNC . why? Because RealVNC's server side is charged, it's hard to find a crack.
TightVNC's official website is http://, free.
Server settings please refer to http://. This involves two passwords, one is the password for the connection, and the other is the management password to be entered for the modification. I'm sorry readers, I forgot to manage the password after the initial setup, so I can't open the setup interface, so I won't give you a screenshot of my... Here are the pictures from the network.
Personally recommend clients to use RealVNC . why? Because RealVNC's client (RealVNC Viewer) is free, it has a beautiful interface, rich functions, and fast response. In contrast, TightVNC is free but too simple. In the same network environment, TightVNC operates Kaka...
RealVNC Viewer's official website is https:// and supports a variety of platforms.

When using, enter the target address 192.168.1.198:5900 in the Viewer (please change 5900 to the port you set on the server) and enter the password as prompted. And you can save the "connection" as a file and place it on the desktop. Each time you double-click the file, it will automatically connect.
Although this is a little more complicated, what good is it? The advantage is that the remote end of the NAS-win10 won't be automatically locked. For example, if the NAS is connected to a TV, you can show what you are doing on the TV in real-time when you use the vnc. When you quit, it will not let the system automatically lock.
Added: If you are connected to your home through a VPN, you can also use VNC, but I still feel that using TeamViewer outside your home is more convenient.
2.3. The most basic file sharing
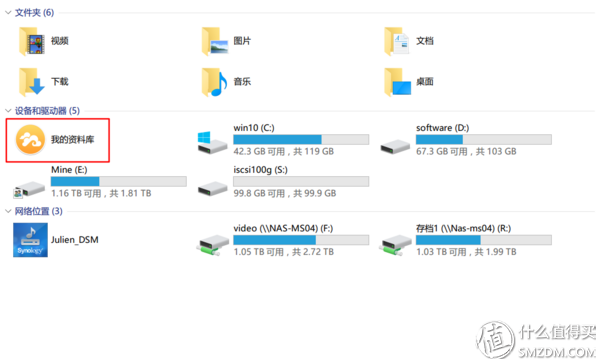
This is not much to say, set up under Windows is very simple, NAS-win10 points right to the folder you want to share, choose to share, select a user (usually your own) can.
Then in PC-win10, directly through the "network" access, or through the "mapped network drive" to assign a fixed partition number (such as F disk, G disk, and the like), more convenient to use.
Insert a question, I hope experienced friends advise: I can not use WinRAR to open all kinds of compressed files in the mapped network drive, always prompt "can not be opened."
3. DownloadWindows platform download, I will add some details
3.1.PT Download
The client I use is μTorrent. This software supports web-site remote access. Just enable this function in the software settings, select the port (default 8080) and password.
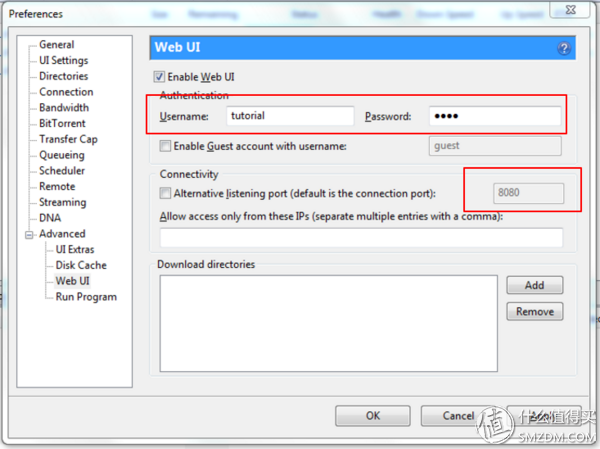
The map above is a map, in fact μTorrent supports Chinese without worrying.
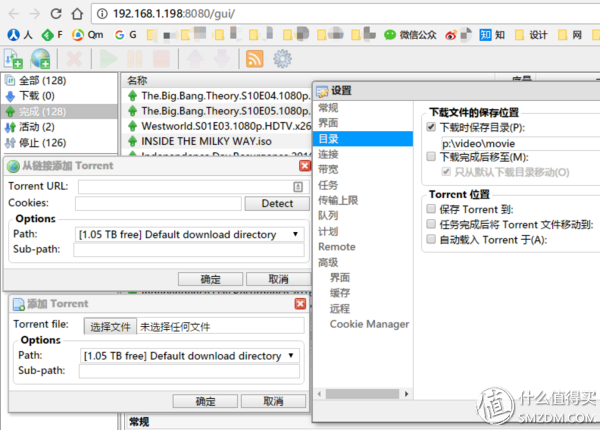
When controlling, visit the address: http://192.168.1.198:8080/gui/ (don't forget the back of this /gui/, I didn't know at the beginning, I can't open)
The user name and password are set by themselves.

The following screenshot shows some of the use of the interface, please note that an iso file has been downloaded, because kodi is to support Blu-ray original iso file playback, please refer to the next article.
Please use rs station's rss subscription function, favorite function, (some stations have download box function), and view the subscribed resources in μTorrent like this:
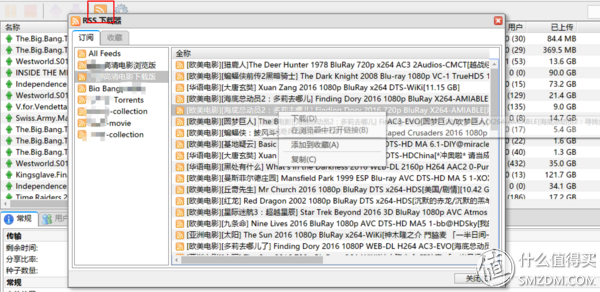
Added: You can set the rss source to automatically download the “favorites†so that when browsing in the pt station, you only need to add resources to the collection. After the NAS updates the rss source regularly, it will be automatically downloaded to the default directory.
3.2. Ordinary download
Use Thunder and Remote Thunder on windows, do not teach it? No longer need to study docker to install Xware.
4. BackupFile backup is very important.
I hope my document folder can automatically back up the current state of the file to the server every 15 minutes, and keep the historical version, which can be traced back to the historical version at any time (for the windows, see 4.1, MAC see 4.3).
I hope that on Saturdays, the system will automatically back up the contents of the C drive to the server so that in the unlikely event that the system crashes or the SSD crashes, I don't have to reinstall the system. I can revert to a week ago, two weeks ago, ... any week before The situation. (Please see 4.2 for Windows, 4.3 for MAC)
I hope that the photos on iphone can be automatically backed up to the server without requiring me to open a software and manually click upload. (A lot of software like Android, but iphone please see 4.4)
4.1. File Backup (Windows File History)
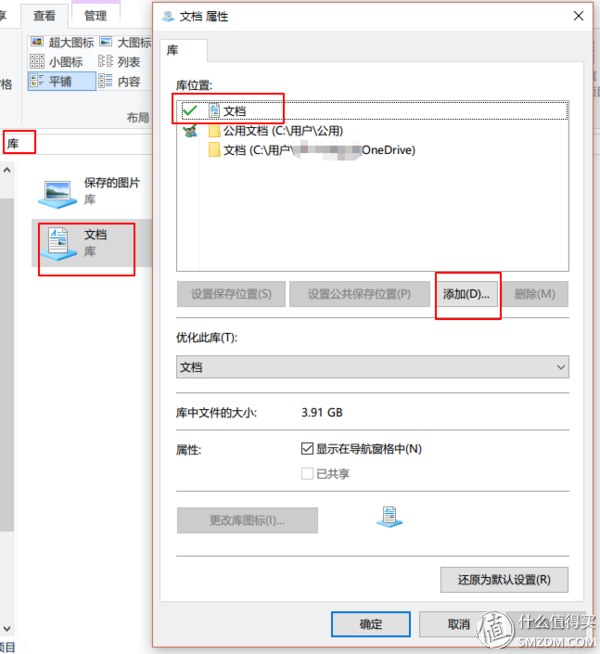
First of all, put all the folders you need to back up into the library, whatever library you like. Of course, you can put the document directory into the document library, and the pictures and photo directories into the image library.
Win10 default setting weakens the concept of the library (this concept is started from vista or win7), if you can not find the library, refer to the following figure.
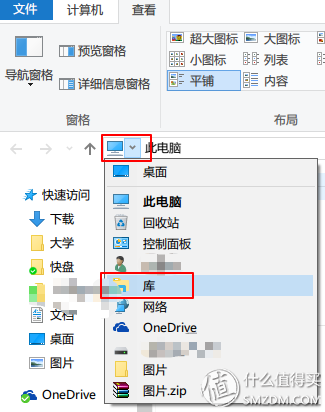
Add a folder to the library, see the figure below. The library is a concept of a virtual folder, do not worry about there will be repeated after the addition.
File history settings and use:
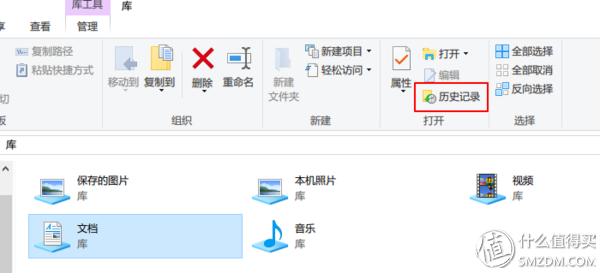
↑ In any bank, click on the history above. If it is set up, you can see the previous history. Regardless of whether it is set or not, you can see a setting button in the upper right corner.

↑ Click here to enter settings. Remember to go back and close the window above, otherwise you won't be able to set it later.

In the new window, the four functions on the left, as the name suggests, have a great effect. Please study on your own. When you start the setup now, you only need to use "Select Driver".
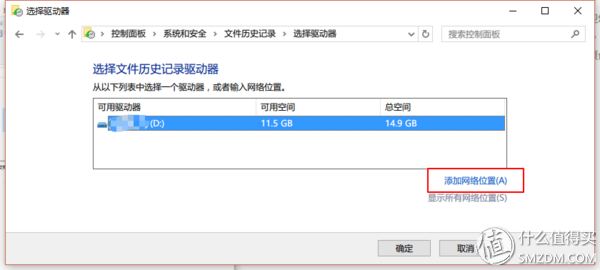
Here, you can see the partitions available in the system, such as U disk, mobile hard disk, hard disk with large remaining space, etc. Click “Add Network Location†to select a folder on your NAS. I won't take a screenshot of this one because I don't have it at home and I don't see folders on the LAN.
Supplement 1: With the advanced settings, you can select the save frequency and the length of the duplicated version. As shown below
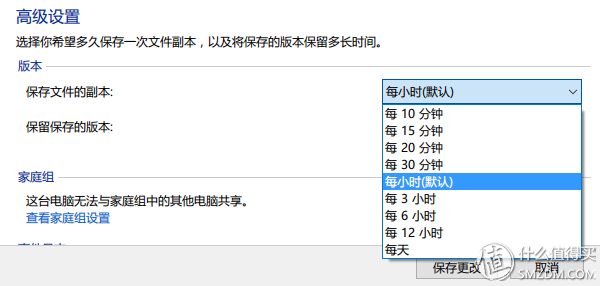
Supplement 2: If you set your own laptop backup file to the NAS, when you are not at home, or when the NAS is shut down, the notebook will back up the time versions of the file to the hidden space on the C drive. When you go home and connect to the wifi, you can When visiting the NAS, the notebook will automatically update these files to the NAS. Is it great?
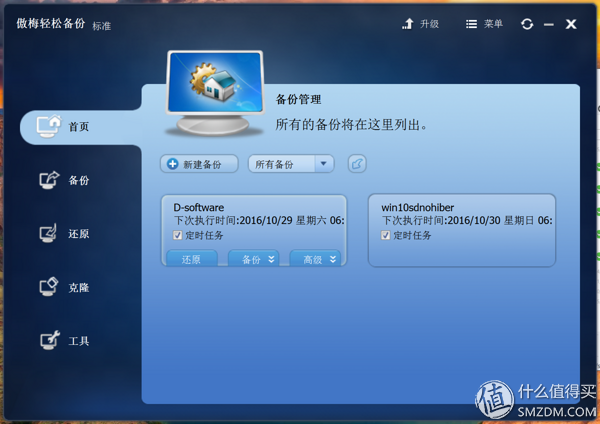
4.2. Operating System Backup/Partition Backup (Ao Mei Easy Backup)
I recommend using Ao Mei Easy Backup.
Support backup to NAS. (Backup to local is even more difficult)
Supports recovery from the NAS (If the system crashes, you can also use pe to start and run the green version. As long as you use the pe with network function, you can connect to NAS to recover).
Support full backups, incremental backups, and differential backups, enabling new backups to be saved weekly, which can be traced back to any historical version at any time without taking up too much room for replication. In addition, the backup speed is very fast!
Support scheduled tasks, as long as the first time to a full backup, after a custom time interval, you can automatically incremental backup, even if this time did not open the computer, the next boot can automatically run the backup task, do not have to worry about.
You can load backup files and extract individual or some files inside. This is very practical for the situation where a single system file is missing, corrupted, and does not remember how to copy the settings file yourself, and how to change the green software result to be unsatisfied with the new version.
Domestic conscience. The Chinese version is free, and the international version is charged. The above functions are all supported. The free Chinese version also has no advertisements, no strange dialogs, and so on.
Of course, the friend @doocoo went one step further and collated and compared all kinds of useful backup software, including AoMei, which we can collect and praise.
4.3. MAC's Time Machine
TimeMachine is a very useful backup tool that comes with the MAC system. It supports backup to mobile hard disk and backup to the AirPort Time Capsule (Apple's own router hardware + hard disk). So even if you don't plan to build a NAS, buy a mobile hard drive to use Time Machine.
I don't know if Windows can build a Time Machine service. If so, please tell me, I'm sure to switch to Windows.
The following is how Synology built Time Machine:
1 Prepare the virtual machine black group Hui: When Synology does Time Machine, the backup destination cannot be a shared directory through NFS. It must be an internal disk. For virtual machines, the backup destination must be placed on the .vhdx virtual disk. This process is not repeated. For the 256G MAC system, I set up a 500G virtual disk file (floating space, not 500G at the beginning) and manage it as a separate disk in Synology.
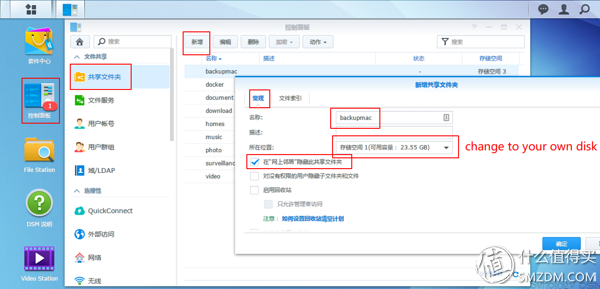
2 In Synology - Control Panel - Shared Folders, add a folder named backupoma, and select the virtual disk you just added.
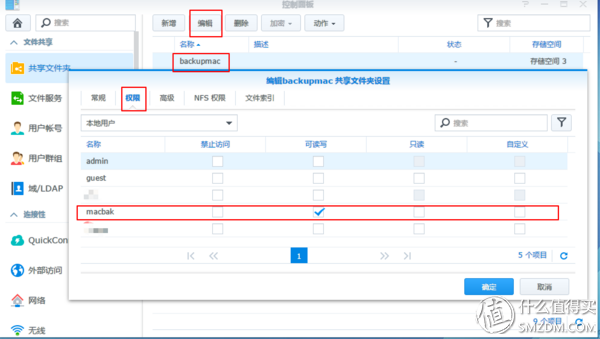
3 Group Fai - Control Panel - Shared Folders, select this folder, click "Edit", in the "Permissions" settings, add the user you want (of course, you can use the administrator can also read and write permissions).
4 Group Faith - Control Panel - File Services - Win/Mac/NFS - Mac File Services - Start TimeMachine and select the folder you just created, and record the access address below.
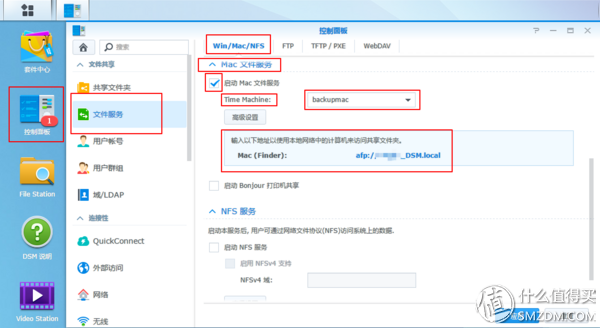
Then go to the MAC system to set up Time Machine and select this server.
In Time Machine's "Select Disk" page, the MAC should find a fake Time Capsule on its own and select it. If you can't find it, try the shared directory address (the one at the beginning of afp://) that Synology told you.
4.4.iPhone photos backed up via photossync
I want to make iPhone photos fully automatic, that is, I don't need to think about it myself every day. I need to back up my photos. I don't need to open a software by myself. Click “Upload†or “Backupâ€.
The iCloud built into the system is certainly the best choice, if you are willing to order enough capacity every month, even if the iCloud server is not walled, access can be faster.
The second "What's Worth to Buy" article was launched in this article - an app named photosync, priced at ¥18.00.

This software I also steal the value of this site friends, @ scottwong, please everyone praise and praise.
Therefore, I will not go into details on how to use the software. In short, it is to install the server-side PhotoSync Companion on the NAS-win10 and set the boot to start automatically. Then in the photosync on the phone, the NAS in the LAN can be searched and set to The destinations of "fast transfer" and "automatic transfer" can be.
The following supplement some additional ideas
1 According to my understanding, on the iOS platform, because the software cannot be used to monitor the photo folder in the background like the Android platform, if you want the App to automatically start uploading photos in the background, the best way to do this is through geography. Fence function trigger.
When you get home, the software detects that the geographic location meets the set target and triggers it automatically. Often, you have already backed up your photos without using a key to open the door. You can set multiple trigger locations. Even at home, you can position your home at the door, on the side of the window, on the side of the house, and on the other side of the house several times to get a wider range. The advantage of this is that you can walk around at home. , sometimes it can trigger automatic backup.
2 Photosync Companion can only backup photos in the LAN after all, how to backup photos from the external network to the home NAS? Here's a new pit:
I opened a WebDAV service on the windows, through the router's port forwarding, released to the external network, you can set this WebDAV as the transmission target in the photosync. In this way, photos can be backed up manually in the outdoors, suitable for daily backups and other scenes when traveling.
The setting of WebDAV is this once for me. Today in order to write this article to re-search on the Internet, could not find the last reference to the article! It may be that the search keyword selection is not good. If you are uncertain, try FTP (insecure, preferably using SFTP), which is supported by the software.
PS: Synology also supports WebDAV. See here for details.
3photosync also has an important function is to transfer photos from the windows to iOS, you can directly import photos into the album, very convenient.
5. Private cloud synchronization disk (Seafile)Network disk, I used to use two, one is Baidu cloud network disk, huge capacity, but I do not trust too much private things, usually backup my various software installation files, especially windows iso and the like .
Another, more commonly used, is the Jinshan Express disk, which has a small capacity and is worth a few tens of G. However, there are basically U-disks instead of the network. It is a great idea to synchronize documents that are commonly used in various tasks. Conceptually, this kind of "synchronous disk" is more appropriate.
There are two prerequisites for building a private cloud synchronization disk: 1 The public cloud synchronization disk has fallen. 2 With the prime minister saying, the network speed doubles for free twice, and the uplink bandwidth also rises. (The uplink of Beijing Unicom 100M fiber is now 10M.) , measured in 12M or so), if the uplink is very slow, downloading home data outdoors is very difficult.
There are several common private cloud synchronization softwares: Seafile, Owncloud, Cloud Station, and BTSync (renamed Resilio). According to my own understanding (if any, please specify):
1, Seafile is characterized by the file is stored on the server side in the form of "blocks", you can not see a separate file, the advantages include 1 can be part of the de-escalation, thus saving space, 2 for the popular online encrypted file virus, Generally does not affect the "block" stored on the server, so you can restore the normal file from the history (this is one of the ads on the official website), 3 upload mechanism I do not know, but guess is also transmitted in the form of "block" Due to the fact that synchronous content is dominated by documents (characterized by “large numbers†and “small†files), this mechanism greatly increases the speed of synchronization. I have tried it at home in Gigabit intranets and feel deep feelings. It is more important than simply copying files. Much faster.
2. The Cloud Station that comes with Synology, I feel that the transmission is very slow for a large number of small files. From the point of view of the transmission interface, each file is transmitted individually. The same Gigabit intranet is far less than that. Seafile speed.
3, Owncloud I have not used, do not comment.
4, BTSync use BT download mode, is decentralized, the disadvantage of this model is that it is difficult to provide historical version features (not used, I guess), and the first few are server and client, server The end can save the historical version.
Let's talk about Seafile, which is also a domestic product, so Chinese support is perfect. The official website is here, and the server and client download pages are here.
5.1. Server side
Server manual: https://manual-cn.seafile.com/, full Chinese, introduction is very detailed.
The server side of Seafile is not installed as a "next step" like the normal software. It is more like a program on Linux. Extract it to a place and run it directly.
According to the server manual, complete the following two pages: (If you do not modify, the default port is 8000, the manual describes)
Https://manual-cn.seafile.com/deploy_windows/download_and_setup_seafile_windows_server.html
Https://manual-cn.seafile.com/deploy_windows/install_seafile_server_as_a_windows_service.html
5.2. Client 5.2.0. Web Edition
Access to the NAS's IP address, for example, 192.168.1.198:8000, can be accessed. The administrator's account password has been set during the server installation process. After doing this 8000 port forwarding, you can use smzdm.f3322.net:8000 to access it, just as convenient as the web version of Baidu Cloud and Jinshan Fast Disk.
Here you can create a new database or you can create a database directly by dragging and dropping folders on your computer and client.
Remember: When you create a new database, if you set a password, all uploaded files will be encrypted, and this password cannot be solved by the administrator! So many people can build servers together and build their own databases, so it's safe for each other.

The features on the web version are also exhaustive, including the historical version features:

(Excuse me for annotating in English, because the screenshot tool can be marked, but the input method cannot be changed...)
5.2.1. Windows side
The client can install all the way to the "next step", remember that in the last step, that is the first time you start Seafile, it will prompt you whether you need to create a "virtual disk", this thing, if you create, unless you Uninstall Seafile, otherwise it cannot be deleted, so please think ahead.
The virtual disk only corresponds to the first database you create in the client. It is such a thing:
 The main interface is as follows:
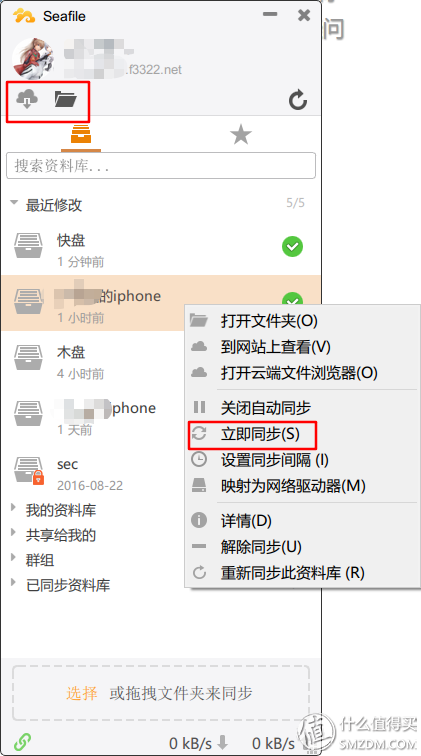
In the database folder, there are also icons that indicate whether they are synchronized. You can also right-click on a file or folder, get a share link, and send it to someone else to download the files/folders.

5.2.2. Mobile Phone Side
Free, great:
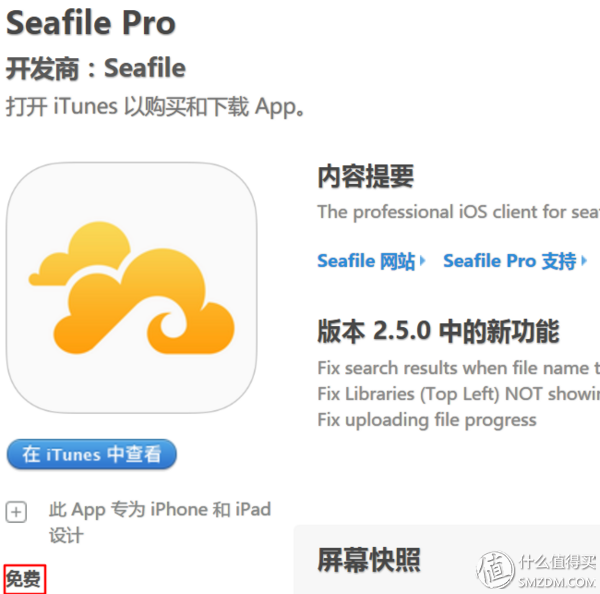
Easy to use, very user-friendly, I will not say more
Finally to the last section.
The idea is very important, if the above thing is done with Synology, such as dynamic domain names, port forwarding, etc. will be very convenient, why do I have to bother to build a Windows-based, group-hui supplemented by NAS? Because I want to use this computer as an HTPC, to play movies and television, so I must have a convenient windows platform.
Since there is a windows platform, for each of the above services, I will choose to achieve a better platform, and the result has become a step by step into windows.
But what if there is no such requirement for HTPC? Please choose the group of Hui, or black group Hui, undoubtedly the most simple, convenient and worry-free. For those who do not have the relevant foundation, if this effort is spent tossing, it is better to raise their own business level and make more money. (Write here, I do not know whether or not you remember what I said at the beginning of the first, in fact, this weekend to apply some professional knowledge to learn, really yo)
But if you can find fun in tossing, tossing is the source of happiness, then... you know me
So, in the end, if Windows and Synology are easier for you to set up, which one should you choose? The following are my ideas, for reference only (I am not a related professional, so many questions are my speculation, may be my own set up incorrectly, welcome to point out)
6.1.Note Station builds private cloud notes (I use)
This did not find the right tool on windows.
Since evernote further tightened the free version of the feature, allowing only two client devices to log in to the client at the same time, I took out its picking tool from chrome.
Note Station can import notes from evernote, so it's easy to migrate and it's about the same as evernote.
Unfortunately, there are no clients on the PC, only mobile phones.
6.2. Cloud Station builds a private cloud synchronization disk (similar to Seafile, I don't use it)
This has already been said, I think Cloud Station is too slow when syncing large numbers of small files.
6.3.Download Station Download Tool (I don't use it)
This tool is very convenient for remote download, because Synology has its own client can import the download address or something. The μTorrent and Thunder, after all, can only be set using web pages, and the operation is slightly troublesome.
The disadvantage is that it will occupy two spaces during downloading. It may not matter for Synology's hard drives, but my virtual hard disk vhdx files will be unwarrantedly increased due to this process, and hyperV will not be able to recover this space. waste.
6.4. Photo Station Photo Management (I don't use it)
Used several times, one of the downsides at the time was that it was unable to fully automate backups like photosync and required manual clicks. However, I heard that I have now added the function of geofence and I do not know how it works.
The second disadvantage is that I used virtual machines to put photos actually stored back into windows through NFS sharing. There is no problem here, but Photo Station will turn photos into hidden files. For me using windows, this I can't stand it.
6.5.Video Station Movie Management (I don't use much)
Because the movies are all on TV, they are rarely viewed on a cell phone. I use a cell phone to see. I prefer to use FileExplorer to view or call VLC or other players on the LAN. I don't really like to let Qunhui stream it after decoding.
(Mainly because I like to watch movies, not TV shows)
However, if you like to store some of the TVs with low quality requirements in the group, and go out into the house while watching them, the streaming provided by Video Station will be a good choice for you (mainly the speed limit).
6.6. VPN Server Establishes VPN Connected to Home Intranet (I don't use much)
I actually use, in addition to the PPTP protocol in the group outside the VPN Server, the remaining OPENVPN and L2TP protocol, dial-up success, the IP to access the Internet is still the client's IP, that is, does not take the VPN channel. Only when accessing the intranet address does the VPN go, so the subjective speculation is that the DNS server settings are not pushed to the client. So eventually set up the VPN server on the router.
6.7. Audio Station (I don't use it)
This is purely because I do not need, because I prefer to use the phone directly airplay to the home speaker.
Thank you again for seeing this, thank you! Welcome to put forward a variety of opinions, I like tossing, you can continue to modify my settings.
More welcome to point out that the mistakes in my article are after all just my own experience. There must be some mistakes, and I also want to learn from them.
Finally, the article image from the TeamViewer official website. 如果一定è¦ç”¨windows,那么 这一个软件å¯ä»¥è§£å†³æœ¬æ–‡ç»å¤§éƒ¨åˆ†é—®é¢˜ ,放在最åŽè¯´è¿™ä¸€å¥è¯ï¼Œä¾›è‰è‰æµè§ˆå…¨æ–‡ç›´æŽ¥æ‹‰åˆ°åº•çœ‹ç»“论的值å‹å‚考
2.1 Ch Speakers,5.1 Ch Speakers,5.1 Ch Soundbar,2.1 Ch Soundbar
Newmax Electronics Co.,LTD , https://www.fspeaker.com